
In today's distributed systems landscape, microservices architecture has become the standard for building scalable, maintainable applications. However, with this architectural shift comes a new set of challenges.
Let's say if one small part of your application stops working properly, it could cause a chain reaction that brings down many other parts or even your entire system. This is similar to how one traffic accident on a busy highway can cause a massive traffic jam.
This is where the circuit breaker pattern shines, and Spring Cloud provides excellent tools to implement this essential resilience pattern. In this blog post, we'll explore how to use Spring Cloud Circuit Breaker to build more robust microservices.
Understanding the Circuit Breaker Pattern
Before diving into the implementation, let's understand the fundamental concept. The circuit breaker pattern, popularized by Michael Nygard in his book "Release It!", works similar to an electrical circuit breaker in your home:
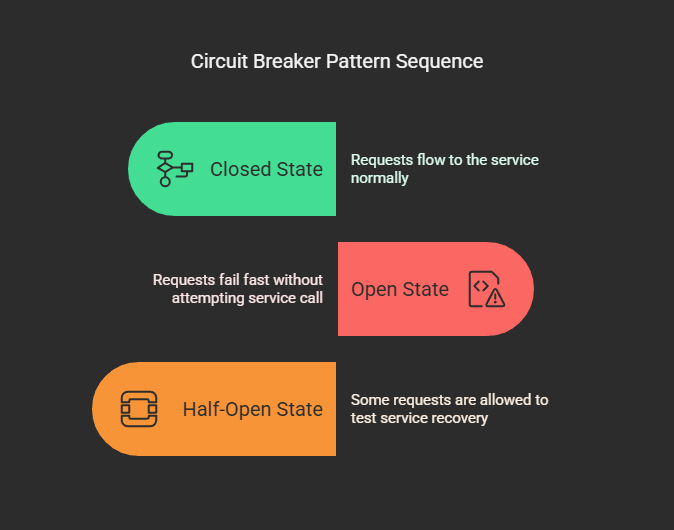
- Closed State (Normal Operation): Requests flow through to the dependent service as usual.
- Open State (Failure Detected): When failures reach a threshold, the circuit "trips" and requests fail fast without even attempting to call the failing service.
- Half-Open State (Testing Recovery): After a timeout period, the circuit allows some requests through to test if the service has recovered.
This pattern prevents your system from repeatedly trying to execute operations that are likely to fail. It allows failed components time to recover. It also protects the system from cascade failures.
Spring Cloud Circuit Breaker
Spring Cloud provides a unified abstraction for various circuit breaker implementations. While Hystrix was the original choice, Resilience4j has become the recommended implementation.
Spring Cloud Circuit Breaker offers a consistent API regardless of which implementation you choose.
Getting Started with Spring Cloud Circuit Breaker
1. Add Dependencies
First, add the necessary dependencies to your Spring Boot application:
<dependency>
    <groupId>org.springframework.cloud</groupId>
    <artifactId>spring-cloud-starter-circuitbreaker-resilience4j</artifactId>
</dependency>
<dependency>
    <groupId>org.springframework.boot</groupId>
    <artifactId>spring-boot-starter-actuator</artifactId>
</dependency>
<dependency>
    <groupId>org.springframework.boot</groupId>
    <artifactId>spring-boot-starter-aop</artifactId>
</dependency>
2. Configure the Circuit Breaker
Spring Cloud Circuit Breaker with Resilience4j can be configured in various ways. Here's a configuration example:
# Resilience4j Circuit Breaker configuration
resilience4j.circuitbreaker.instances.thirdPartyService.registerHealthIndicator=true
resilience4j.circuitbreaker.instances.thirdPartyService.slidingWindowSize=10
resilience4j.circuitbreaker.instances.thirdPartyService.minimumNumberOfCalls=5
resilience4j.circuitbreaker.instances.thirdPartyService.permittedNumberOfCallsInHalfOpenState=3
resilience4j.circuitbreaker.instances.thirdPartyService.automaticTransitionFromOpenToHalfOpenEnabled=true
resilience4j.circuitbreaker.instances.thirdPartyService.waitDurationInOpenState=10s
resilience4j.circuitbreaker.instances.thirdPartyService.failureRateThreshold=50
resilience4j.circuitbreaker.instances.thirdPartyService.eventConsumerBufferSize=10
Here's a shorter explanation of each circuit breaker property:
- registerHealthIndicator=true: Exposes the circuit breaker's health status through Spring Boot's health endpoint
- slidingWindowSize=10: Uses last 10 calls to calculate failure rates.
- minimumNumberOfCalls=5: Requires 5+ calls before circuit can trip.
- permittedNumberOfCallsInHalfOpenState=3: Allows 3 test calls when half-open.
- automaticTransitionFromOpenToHalfOpenEnabled=true: Auto-shifts to half-open after wait duration.
- waitDurationInOpenState=10s: Stays open for 10 seconds before testing recovery.
- failureRateThreshold=50: Trips when failure rate exceeds 50%.
- eventConsumerBufferSize=10: Stores 10 circuit events for monitoring.
3. Apply Circuit Breaker to Service Calls
Now you can apply the circuit breaker to your service calls. There are two main approaches:
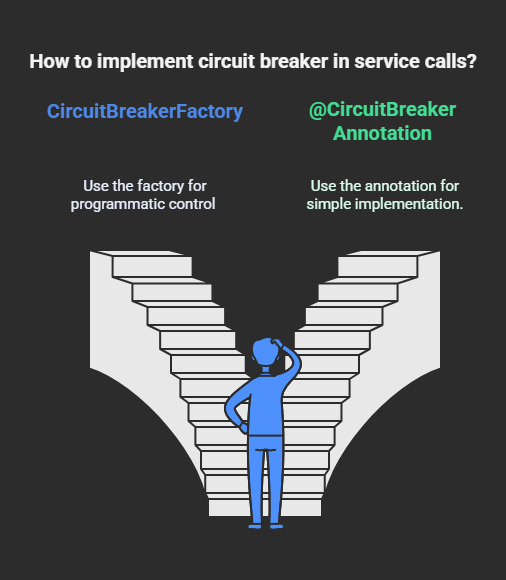
3.1. Using the CircuitBreakerFactory directly:
@Service
public class ProductService {
    private final RestTemplate restTemplate;
    private final CircuitBreakerFactory circuitBreakerFactory;

    // Constructor goes here

    public Product getProductDetails(Long productId) {
        CircuitBreaker circuitBreaker circuitBreakerFactory.create("productService");

        return circuitBreaker.run(
            () -> restTemplate.getForObject("/api/products/{id}", Product.class, productId),
            throwable -> getDefaultProduct(productId)  // Fallback method
        );
    }

    private Product getDefaultProduct(Long productId) {
        return new Product(productId, "Fallback Product", 0.0);
    }
}
3.2. Using the @CircuitBreaker annotation:
@Service
public class ProductService {
    private final RestTemplate restTemplate;
    // Constructor goes here

    @CircuitBreaker(name = "productService", fallbackMethod = "getDefaultProduct")
    public Product getProductDetails(Long productId) {
        return restTemplate.getForObject("/api/products/{id}", Product.class, productId);
    }

    private Product getDefaultProduct(Long productId, Exception e) {
        return new Product(productId, "Fallback Product", 0.0);
    }
}
Monitoring Circuit Breakers
Monitoring the state of your circuit breakers is crucial for understanding system health. Spring Boot Actuator provides endpoints to monitor circuit breaker states.
Enable the circuit breaker endpoints in application.properties:
management.endpoints.web.exposure.include=health,circuitbreakers
management.health.circuitbreakers.enabled=true
management.endpoint.health.show-details=always
This exposes endpoints that show the state of all circuit breakers in your application.
You can monitor open/closed status, failure rates, call statistics, and history of state transitions.
Proof of Concept (POC)
Our demonstration consists of two services:
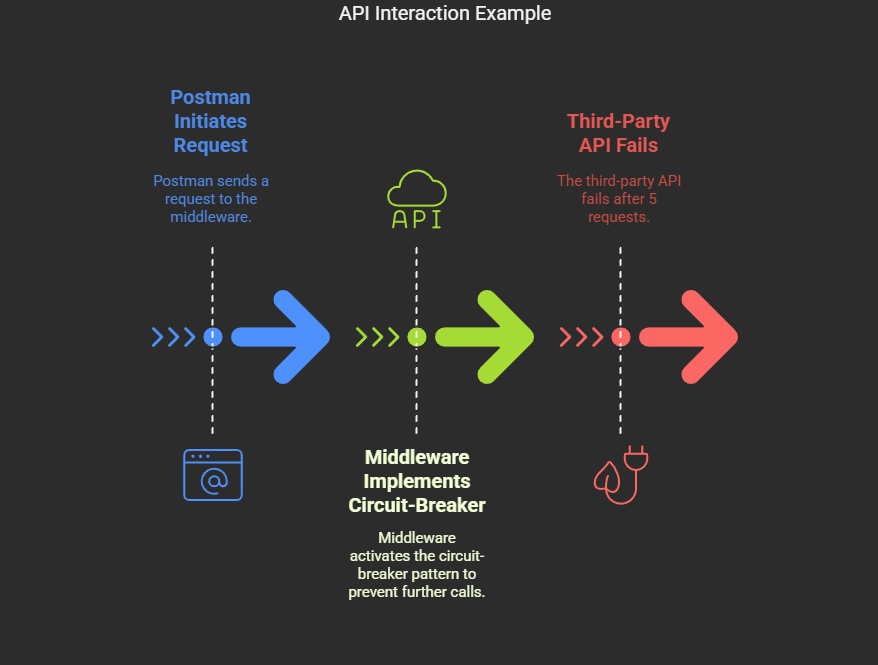
- A third-party API that intentionally fails after 5 requests
- A middleware service that implements circuit-breaker patterns
Let's examine our simplified third-party service running on port 8082:
@RestController
class ThirdPartyController {
    private final AtomicInteger requestCounter = new AtomicInteger(0);
    private final int MAX_REQUESTS = 5;
    private final long RECOVERY_TIME_MS = 30000; // 30 seconds
    private volatile long recoveryEndTime = 0;

    @GetMapping("/api/data")
    public ResponseEntity<Object> getData() {
        // This service do the following
        // 1. The service allows up to 5 requests to succeed normally
        // 2. After the 5th request, it enters a "recovery mode" for 30 seconds
        // 3. During recovery, all requests receive a 503 Service Unavailable response
        // 4. Once the recovery period ends, the service resets and begins accepting requests again
        // 5. You can find the complete code in our GitHub repository linked at the end of this blog.
    }
}
Our middleware service implements several resilience patterns using @CircuitBreaker annotation. Here's the controller:
@RestController
class CloudController {
private static final String BACKEND_SERVICE = "thirdPartyService";
@Autowired
private RestTemplate restTemplate;
@Value("${third-party.service.url}")
private String thirdPartyServiceUrl;
@GetMapping("/api/cloud-data")
@CircuitBreaker(name = BACKEND_SERVICE, fallbackMethod = "fallbackData")
@Retry(name = BACKEND_SERVICE)
@Bulkhead(name = BACKEND_SERVICE)
public Map<String, Object> getCloudData() {
// Call third-party service
// You can find the complete code in our GitHub repository linked at the end of this blog.
}
// Fallback method for circuit breaker
public Map<String, Object> fallbackData(Exception e) {
Map<String, Object> fallbackThirdPartyData = new HashMap<>();
fallbackThirdPartyData.put("message", "Fallback response from Cloud Service");
fallbackThirdPartyData.put("reason", e.getMessage());
fallbackThirdPartyData.put("status", "Circuit is OPEN");
Map<String, Object> response = new HashMap<>();
response.put("source", "Spring Cloud Component");
response.put("thirdPartyData", fallbackThirdPartyData);
response.put("timestamp", System.currentTimeMillis());
return response;
}
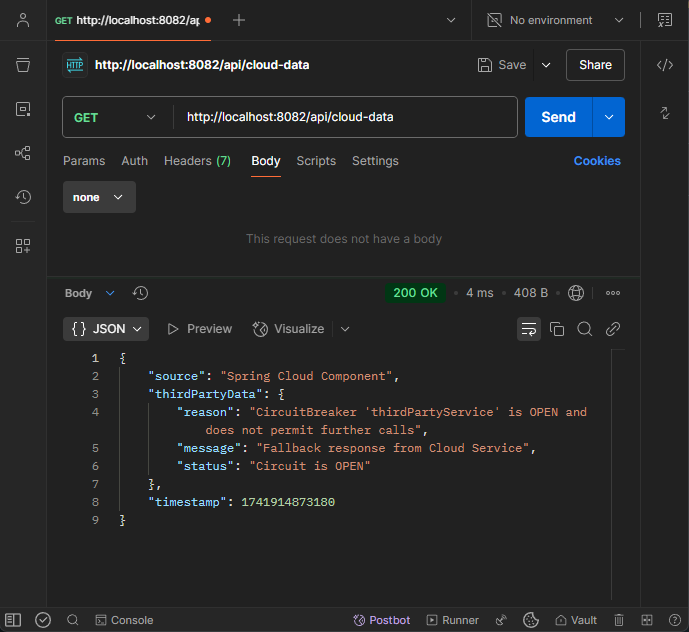
}In our demonstration, the first 5 API calls execute successfully, with the cloud service seamlessly passing through third-party responses.
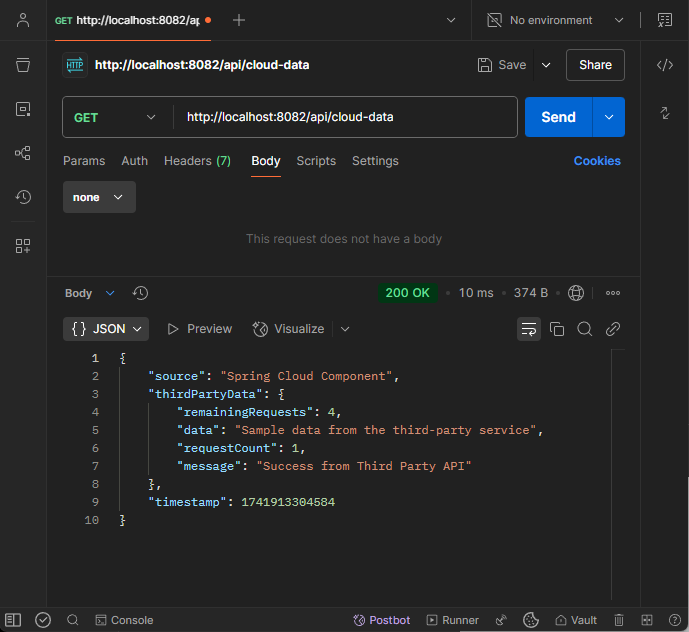
On the 6th request, the third-party service fails but our middleware still makes the call and returns the error from downstream.

The true resilience shines around the 9th request, when our failure rate crosses the 50% threshold - at this point, Resilience4j's circuit breaker trips open and stops calling the third-party service entirely. Instead, requests are immediately routed to our fallback method
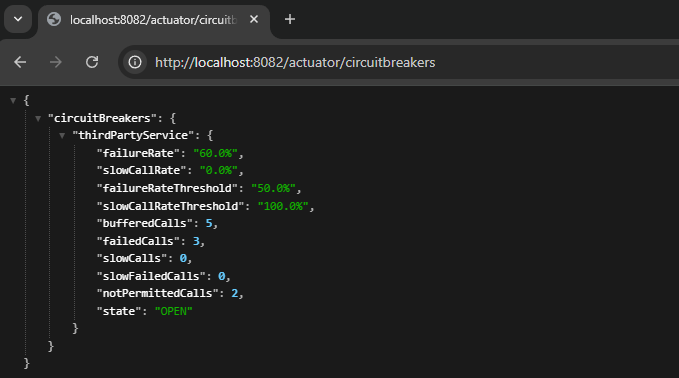
And you can check its status using spring actuator as shown below
Conclusion
Spring Cloud Circuit Breaker provides a powerful abstraction for implementing resilience patterns in microservices architectures. By properly implementing circuit breakers, you can build systems that gracefully handle partial failures and improve user experience during service disruptions.
As distributed systems grow more complex, patterns like circuit breaking become essential tools in your resilience engineering toolkit. Spring Cloud makes these patterns accessible and straightforward to implement.
Remember that circuit breaking is just one part of a comprehensive resilience strategy, but it's an excellent place to start on your journey toward more robust microservices.
This blog post covered Spring Cloud Circuit Breaker with Resilience4j implementation. The Spring ecosystem continues to evolve, so always check the latest documentation for the most up-to-date information.
Want to learn more?
👉 Read Next: Rate Limiting Using Spring Cloud
👉 Read Next: Circuit Breaking Using Spring Cloud
👉 Read Next: Performance Monitoring Using Spring Cloud