An Authorization Server is one of the core component of the OAuth 2.0 public Specifications (You can check them here) which issues access tokens to clients after successfully authenticating users.
Rather than coding authentication logic yourself, Spring Security offers a solid implementation that you can configure to your particular requirements.
In this blog post, we will explain the Authorization Code Flow and walk through a complete Spring Boot implementation example.
What is the Authorization Code Flow?
The Authorization Code Flow is designed for applications that can securely store a client secret. This flow provides a higher level of security compared to other OAuth 2.0 grant types because it involves a back-channel communication between the application server and the authorization server, rather than exposing tokens directly to the browser.
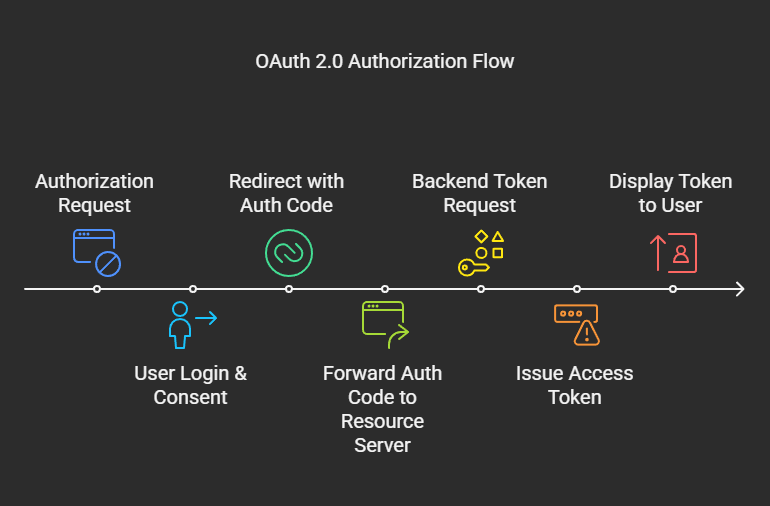
The flow works as follows:
- The user clicks "Login" on your application
- Your application redirects to the authorization server with client ID, scopes, and redirect URI
- The user authenticates and authorizes the requested permissions
- The authorization server redirects back to your frontend application with a temporary authorization code
- Your frontend application exchanges this code with its application backend server for access tokens using a secure back-channel request
- With tokens obtained, the application can access protected resources
Why Use Authorization Code Flow?

- Separation of Concerns: Authentication/authorization is delegated to a specialized service
- Single Sign-On: Enables unified login experience across multiple applications
- Support for Refresh Tokens: Allows obtaining new access tokens without user interaction
Spring Boot Implementation
The authorization server is the cornerstone of our OAuth2 implementation. It handles authentication, consent, and issuing tokens.
Project Structure
The project is organized into two separate Spring Boot applications:
authorization-code-flow-spring-boot/
├── authorization-server-spring-boot/   # OAuth2 Authorization Server
└── resource-server-spring-boot/        # OAuth2 Resource Server
Authorization Server Implementation
The authorization server is responsible for authenticating users and issuing tokens. Let's look at the key components:

1.Dependecies
We'll start with a Spring Boot application with the necessary dependencies:
<dependencies>
      <dependency>
          <groupId>org.springframework.boot</groupId>
          <artifactId>spring-boot-starter-oauth2-authorization-server</artifactId>
      </dependency>
      <dependency>
          <groupId>org.springframework.boot</groupId>
          <artifactId>spring-boot-starter-security</artifactId>
      </dependency>
      <dependency>
          <groupId>org.springframework.boot</groupId>
          <artifactId>spring-boot-starter-web</artifactId>
      </dependency>
</dependencies>
2. Application Properties
server.servlet.context-path=/authorization-server
server.port=9090
3. Authorization Server Configuration
This configuration class is responsible for setting up a Spring Resource Server, which validate access tokens in the OAuth 2.0 Authorization Code Flow.
Here’s a breakdown of its functionality:
3.1. First SecurityFilterChain Configuration
@Bean
@Order(1)
public SecurityFilterChain authorizationServerSecurityFilterChain(HttpSecurity http) throws Exception {
    OAuth2AuthorizationServerConfigurer authorizationServerConfigurer =
        OAuth2AuthorizationServerConfigurer.authorizationServer();

    return http
            .securityMatcher(authorizationServerConfigurer.getEndpointsMatcher())
            .with(authorizationServerConfigurer, Customizer.withDefaults())
            .authorizeHttpRequests(authorize -> authorize.anyRequest().authenticated())
            .formLogin(Customizer.withDefaults())
            .build();
}
This section configures the security for the authorization server endpoints:
@Order(1)annotation: Ensures this filter chain is the first one executedOAuth2AuthorizationServerConfigurer: Set up the OAuth 2.0 standard and default configuration..authorizeHttpRequests(...): Force authentication for all authorization server endpoints..formLogin()enables and redirect to form-based login page for unauthorized users
3.2. Second SecurityFilterChain Configuration
@Bean
@Order(2)
public SecurityFilterChain defaultSecurityFilterChain(HttpSecurity http) throws Exception {
    // This chain is used for other endpoints.
    http
            .authorizeHttpRequests(authorize -> authorize.anyRequest().authenticated())
            .formLogin(Customizer.withDefaults());
    return http.build();
}
.authorizeHttpRequests(authorize -> authorize.anyRequest().authenticated())configures Spring Security to require authentication for all HTTP requests in the application..formLogin(Customizer.withDefaults())enables and redirect to form-based login page for unauthorized users
3.3. Client Registration
@Bean
public RegisteredClientRepository registeredClientRepository() {
    RegisteredClient client =
            RegisteredClient.withId(UUID.randomUUID().toString())
            .clientId("custom-client-id")
            .clientSecret("custom-client-secret")
            .authorizationGrantType(AuthorizationGrantType.AUTHORIZATION_CODE)
            .redirectUri("http://localhost:8080/resource-server/auth-confirmation")
            .scope("test_resources")
            .build();

    return new InMemoryRegisteredClientRepository(client);
}
This section registers a client application that will use the authorization server:
RegisteredClient.withId(UUID.randomUUID().toString())creates a client with a random UUID..clientId("custom-client-id")sets the client ID tocustom-client-id..clientSecret("custom-client-secret")sets the client password tocustom-client-id..authorizationGrantType(AuthorizationGrantType.AUTHORIZATION_CODE): It specifies that this client will use theAuthorization Codegrant type.redirectUri("http://localhost:8080/resource-server/auth-confirmation")defines the redirect endpoint..scope("test_resources")It defines the scopetest_resourcesthat this client can request
3.4. User Details Service
@Bean
public UserDetailsService userDetailsService() {
    UserDetails user = User.withUsername("amdose")
            .password("amdose")
            .roles("USER")
            .build();
    return new InMemoryUserDetailsManager(user);
}
This section sets up a user store for authentication:
- It creates a single test user with username and password both set to
amdose - It assigns the
USERrole to this user - It uses an in-memory user manager (again, it is used for demo purposes)
This configuration provides a complete, though simplified, authorization server that can authenticate users, register client applications, and issue tokens for the Authorization Code Flow.
3.5. Authorization server with default settings
// 4. Configure Authorization Server settings
@Bean
public AuthorizationServerSettings authorizationServerSettings() {
    return AuthorizationServerSettings.builder().build();
}AuthorizationServerSettings.builder().build(): creates a default OAuth2 authorization server configuration with standard endpoints and settings.
Resource Server Configuration
A resource server guards its data and services, only allowing access when provided with valid tokens from authenticated users.
1.Dependencies
We'll start with a Spring Boot application with the necessary dependencies:
<dependencies>
      <dependency>
          <groupId>org.springframework.boot</groupId>
          <artifactId>spring-boot-starter-oauth2-resource-server</artifactId>
      </dependency>
      <dependency>
          <groupId>org.springframework.boot</groupId>
          <artifactId>spring-boot-starter-web</artifactId>
      </dependency>
      <dependency>
          <groupId>org.springframework.boot</groupId>
          <artifactId>spring-boot-starter-thymeleaf</artifactId>
      </dependency>
</dependencies>
2.Application Properties
spring.application.name=server.resource
server.servlet.context-path=/resource-server
server.port=8080

#
spring.security.oauth2.resource-server.jwt.issuer-uri=http://localhost:9090/authorization-server
spring.security.oauth2.resource-server.jwt.jwk-set-uri=http://localhost:9090/authorization-server/oauth2/jwks
your resource server needs clear configuration. Here's what each oauth2 property in the application.properties file does:
issuer-uri: Tells Spring where your tokens are coming fromjwk-set-uri: Specifies where to find the keys to verify token signatures
3.Configuration
This configuration class sets up a Spring Resource Server that validates OAuth 2.0 tokens and protects resources. Let me break down what each part is doing:
3.1 SecurityFilterChain Configuration
@Bean
public SecurityFilterChain securityFilterChain(HttpSecurity http) throws Exception {
    http
        .csrf(AbstractHttpConfigurer::disable)
        .authorizeHttpRequests(auth -> auth
            .requestMatchers("/auth-confirmation/**", "/exchange-token/**").permitAll()
            .requestMatchers("/test/**").hasAuthority("SCOPE_test_resources")
            .anyRequest().authenticated()
        )
        .sessionManagement(session -> session.sessionCreationPolicy(SessionCreationPolicy.STATELESS))
        .oauth2ResourceServer(oauth2 -> oauth2.jwt(jwt -> jwt.jwtAuthenticationConverter(jwtAuthenticationConverter())));

    return http.build();
}
This SecurityFilterChain bean configures how your Spring Boot resource server protects different endpoints:
requestMatchers("/auth-confirmation/**", "/exchange-token/**").permitAll(): Makes endpoints/auth-confirmation/**and/exchange-token/**are publicly accessiblerequestMatchers("/test/**").hasAuthority("SCOPE_test_resources"): Restricts/testendpoints to users with thetest_resourcesscopeoauth2ResourceServer(oauth2 -> oauth2.jwt()): Sets up JWT token validationjwtAuthenticationConverter(): Converts JWT claims into Spring Security authorities.
@Bean
public JwtAuthenticationConverter jwtAuthenticationConverter() {
    JwtGrantedAuthoritiesConverter grantedAuthoritiesConverter = new JwtGrantedAuthoritiesConverter();
    grantedAuthoritiesConverter.setAuthorityPrefix("SCOPE_"); // Ensure scope-based security
    grantedAuthoritiesConverter.setAuthoritiesClaimName("scope");

    JwtAuthenticationConverter authenticationConverter = new JwtAuthenticationConverter();
    authenticationConverter.setJwtGrantedAuthoritiesConverter(grantedAuthoritiesConverter);
    return authenticationConverter;
}
Controllers
Test API
Testing API is to test the final generated token.
@GetMapping("/test/worked")
public String test() {
    return "It Worked!";
}
Exchange API
Exchange API is to exchange code for token
@PostMapping("/exchange-token")
public String exchangeToken(@RequestParam String authorizationCode, Model model) {
    try {
        // Exchange code for token
        String token = this.exchangeCodeForToken(authorizationCode);

        // Add token to model
        model.addAttribute("token", token);

        // Return the token-success template directly
        return "token-success";
    } catch (Exception e) {
        model.addAttribute("error", "Failed to exchange token: " + e.getMessage());
        model.addAttribute("authorizationCode", authorizationCode);
        return "authorization-confirmation";
    }
}
private String exchangeCodeForToken(String authorizationCode) {
// Implementation to exchange code for token
// Typically using RestTemplate or WebClient to call OAuth token endpoint
// Example with RestTemplate:
RestTemplate restTemplate = new RestTemplate();
String credentials = clientId + ":" + clientSecret;
String encodedCredentials = Base64.getEncoder().encodeToString(credentials.getBytes());
HttpHeaders headers = new HttpHeaders();
headers.setContentType(MediaType.APPLICATION_FORM_URLENCODED);
headers.add("Authorization", "Basic " + encodedCredentials);
MultiValueMap<String, String> requestBody = new LinkedMultiValueMap<>();
requestBody.add("grant_type", "authorization_code");
requestBody.add("code", authorizationCode);
requestBody.add("redirect_uri", redirectUri);
HttpEntity<MultiValueMap<String, String>> requestEntity = new HttpEntity<>(requestBody, headers);
ResponseEntity<TokenResponse> response = restTemplate.postForEntity(
authorizationServerBaeUrl + tokenEndpoint, requestEntity, TokenResponse.class);
return response.getBody().getAccessToken();
}Testing Guide
Now it comes the testing phase

1. Start Both Servers
First, make sure both servers are up and running:
# Terminal 1 - Start the Authorization Server
cd authorization-server-spring-boot
./mvnw spring-boot:run

# Terminal 2 - Start the Resource Server
cd resource-server-spring-boot
./mvnw spring-boot:run
2. Initiate the Authorization Flow
Open your browser and navigate to the following URL to start the authorization process:
http://localhost:9090/authorization-server/oauth2/authorize?response_type=code&client_id=custom-client-id&scope=test_resources&redirect_uri=http://localhost:8080/resource-server/auth-confirmationThis URL tells the authorization server:
- We want an authorization code (
response_type=code) - We're identifying ourselves as
custom-client-id - We're requesting the
test_resourcesscope - We want the code sent to our resource server at
/auth-confirmation
3. Log In to the Authorization Server
Since you won't be authorized at your first attempt. so, you'll be presented with a login form. Enter the credentials:
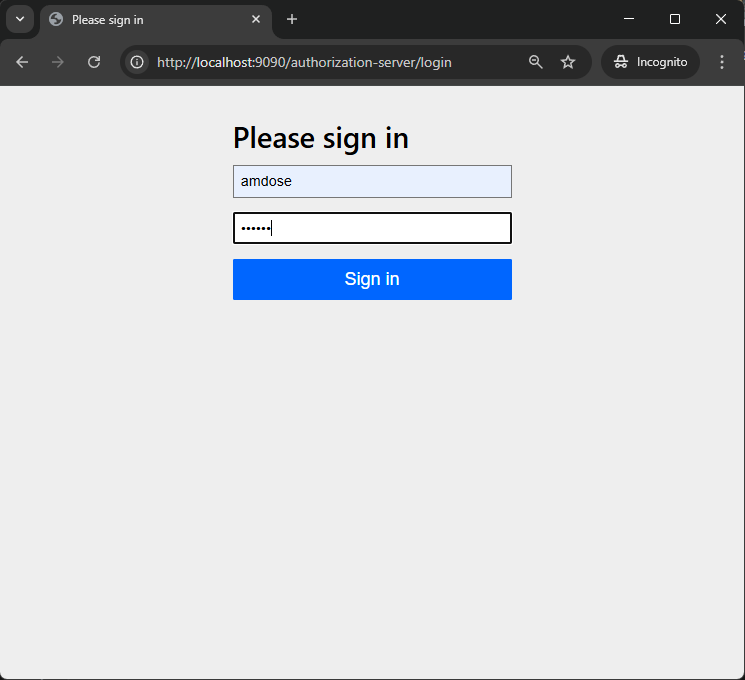
- Username:
amdose - Password:
amdose
4. Review Authorization Code
Once approved, you'll be redirected to the resource server's confirmation page displaying the authorization code. The URL will look something like:
http://localhost:8080/resource-server/auth-confirmation?code=ABC123XYZ
The page will show the received authorization code and ask if you want to exchange it for an access token. This is a custom page we created to make the process easier to understand.
6. Exchange for Access Token
Click the "Yes, Exchange for Token" button. The frontend application will send the authorization code to the resource server and the resource server will do the following:
- Send the authorization code to the authorization server's token endpoint
- Resource server will exchange the code for token using
/oauth2/tokenendpoint - Receive an access token in response
PS: This job should be done by your frontend application under the hood. Same what this app does.
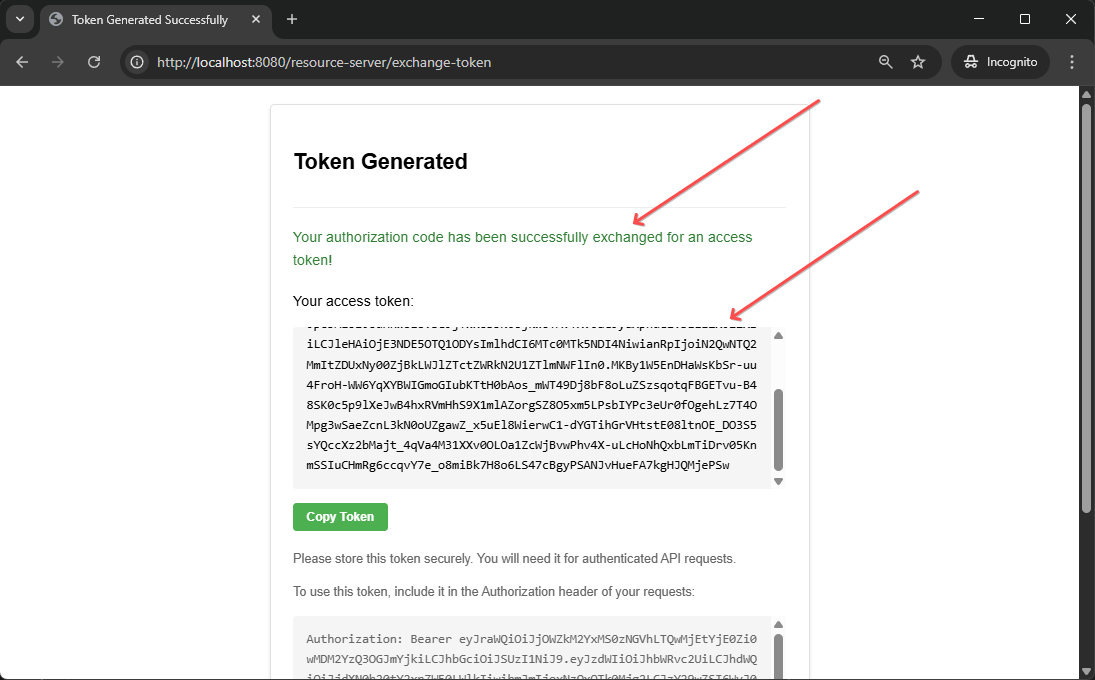
7. View and Copy the Access Token
After the exchange is complete, you'll see a success page displaying the access token. The page also shows instructions on how to use the token for API requests.
8. Test Protected Resource Access
Now let's verify that the token works by accessing a protected resource. You can use curl, Postman, or any HTTP client of your choice.
With curl:
curl -H "Authorization: Bearer YOUR_ACCESS_TOKEN" http://localhost:8080/resource-server/test/workedReplace YOUR_ACCESS_TOKEN with the token you received.
If everything is working correctly, you should get the following response:
It Worked!

9. Test Without Token (Optional)
To verify that the resource is actually protected, try accessing it without a valid token:
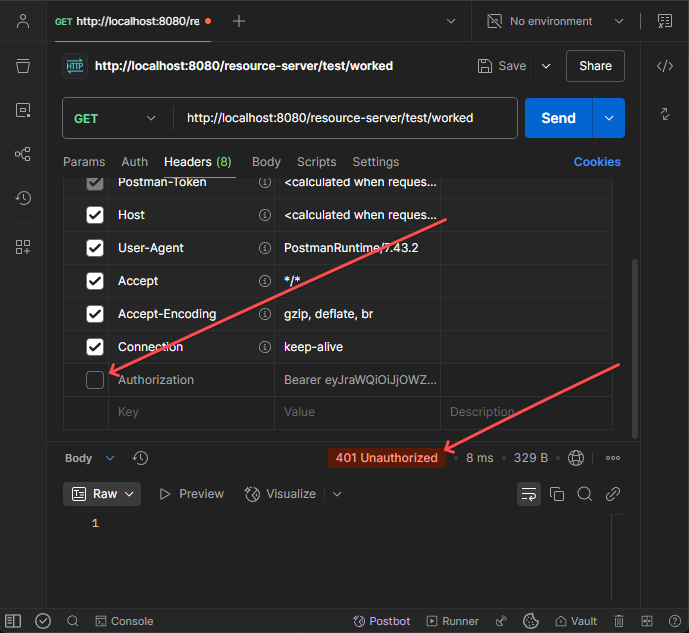
You should receive a 401 Unauthorized error, confirming that the endpoint is properly secured.
Conclusion
The OAuth 2.0 Authorization Code Flow provides a robust security framework for modern web applications. Spring Boot significantly simplifies the implementation of this flow, allowing developers to focus on business logic rather than security plumbing.
By following the patterns and practices outlined in this blog, you can create secure, scalable applications that protect user resources while providing a seamless authentication experience.
Remember that security is an ongoing process. Stay updated with the latest Spring Security releases and OAuth 2.0 best practices to ensure your application remains secure against evolving threats.
Want to learn more?
👉 Read Next: Rate Limiting Using Spring Cloud
👉 Read Next: Circuit Breaking Using Spring Cloud
👉 Read Next: Performance Monitoring Using Spring Cloud