
In today's world of microservices architecture, managing service-to-service communication is a significant challenge. As applications scale and services multiply, manually configuring connection details becomes impractical and error-prone. This is where service discovery comes into play, and Netflix Eureka is one of the most popular solutions, especially when working with Spring Boot.
In this blog, we will explore how to implement Eureka for service discovery in Spring Boot applications, covering server setup, client registration, and best practices for production deployments.
What is Service Discovery?
Service discovery is a mechanism that helps microservices find and communicate with each other without hardcoding hostnames or port information.

In a dynamic cloud environment where services can scale up, scale down, or move between hosts, service discovery becomes essential.
Why Netflix Eureka?
Netflix Eureka is an open-source service discovery tool developed by Netflix as part of their cloud infrastructure.
It has become a standard in the Spring ecosystem due to its seamless integration with Spring Boot through Spring Cloud.
Key benefits of Eureka include:
- Self-registration of services
- Health monitoring
- Load-balanced client-side service calls
- High availability through replication
- Integration with Spring Boot via Spring Cloud
Setting Up a Eureka Server
Let's start by creating a Eureka Server that will act as our service registry.
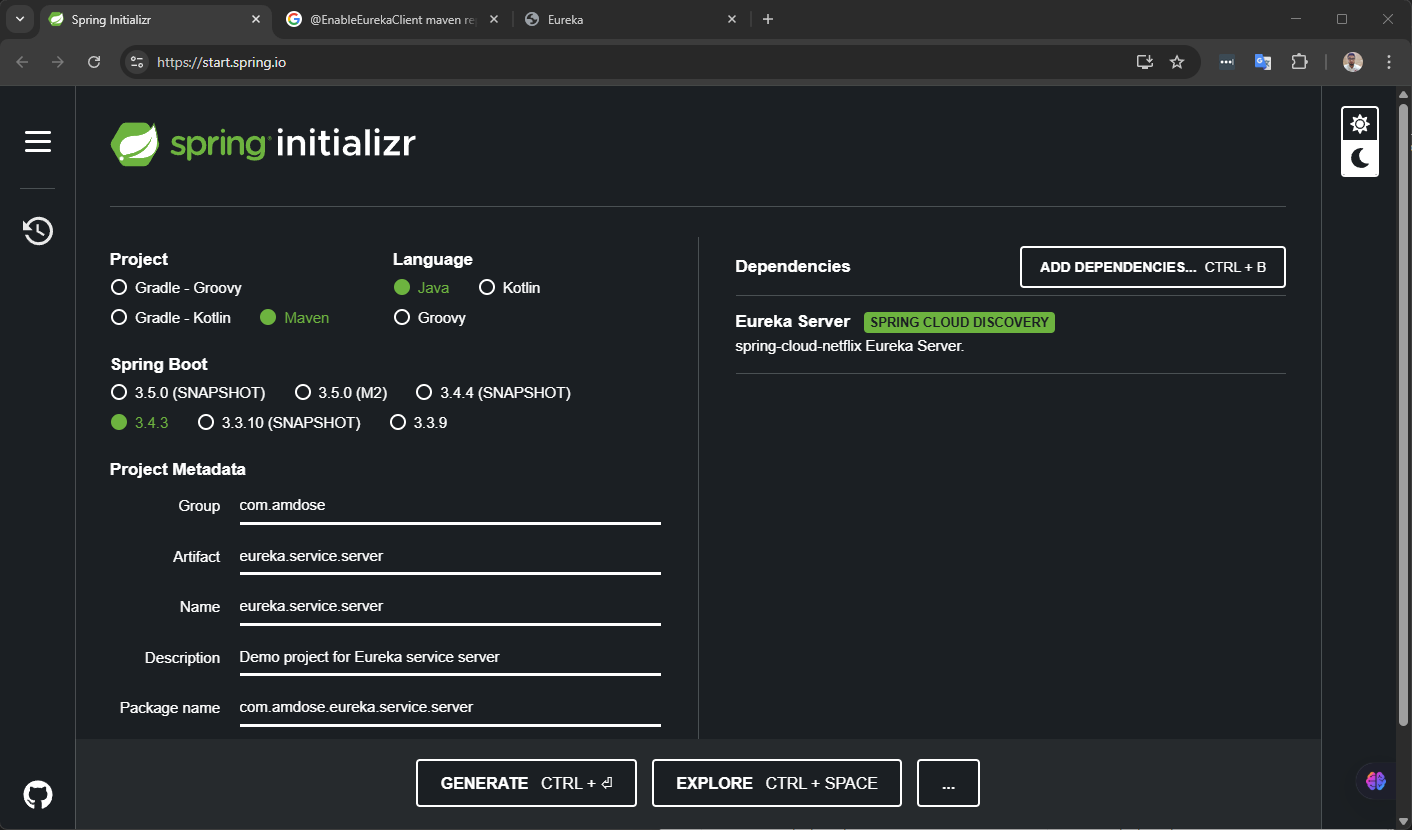
Step 1: Create a Spring Boot Project
Use Spring Initializr to create a new Spring Boot project with the following dependencies:
- Spring Cloud Netflix Eureka Server
Step 2: Configure the Application
After creating the project, open the application.properties file and add the following configuration:
spring.application.name=eureka-server
server.port=8761

eureka.client.register-with-eureka=false
eureka.client.fetch-registry=false
eureka.server.wait-time-in-ms-when-sync-empty=0
This configuration:
- Sets the server port to 8761 (the default for Eureka)
- Prevents the server from registering with itself
- Disables fetching the registry, as this is a standalone server
Step 3: Enable Eureka Server
Open your main application class and add the @EnableEurekaServer annotation:
import org.springframework.boot.SpringApplication;
import org.springframework.boot.autoconfigure.SpringBootApplication;
import org.springframework.cloud.netflix.eureka.server.EnableEurekaServer;

@EnableEurekaServer // <-- Add This
@SpringBootApplication
public class EurekaServerApplication {
    public static void main(String[] args) {
        SpringApplication.run(EurekaServerApplication.class, args);
    }
}
That's it! You now have a basic Eureka Server. When you run this application, you can access the Eureka dashboard at http://localhost:8761.
Creating a Eureka Service
Now, let's create a service that will register with our Eureka Server.
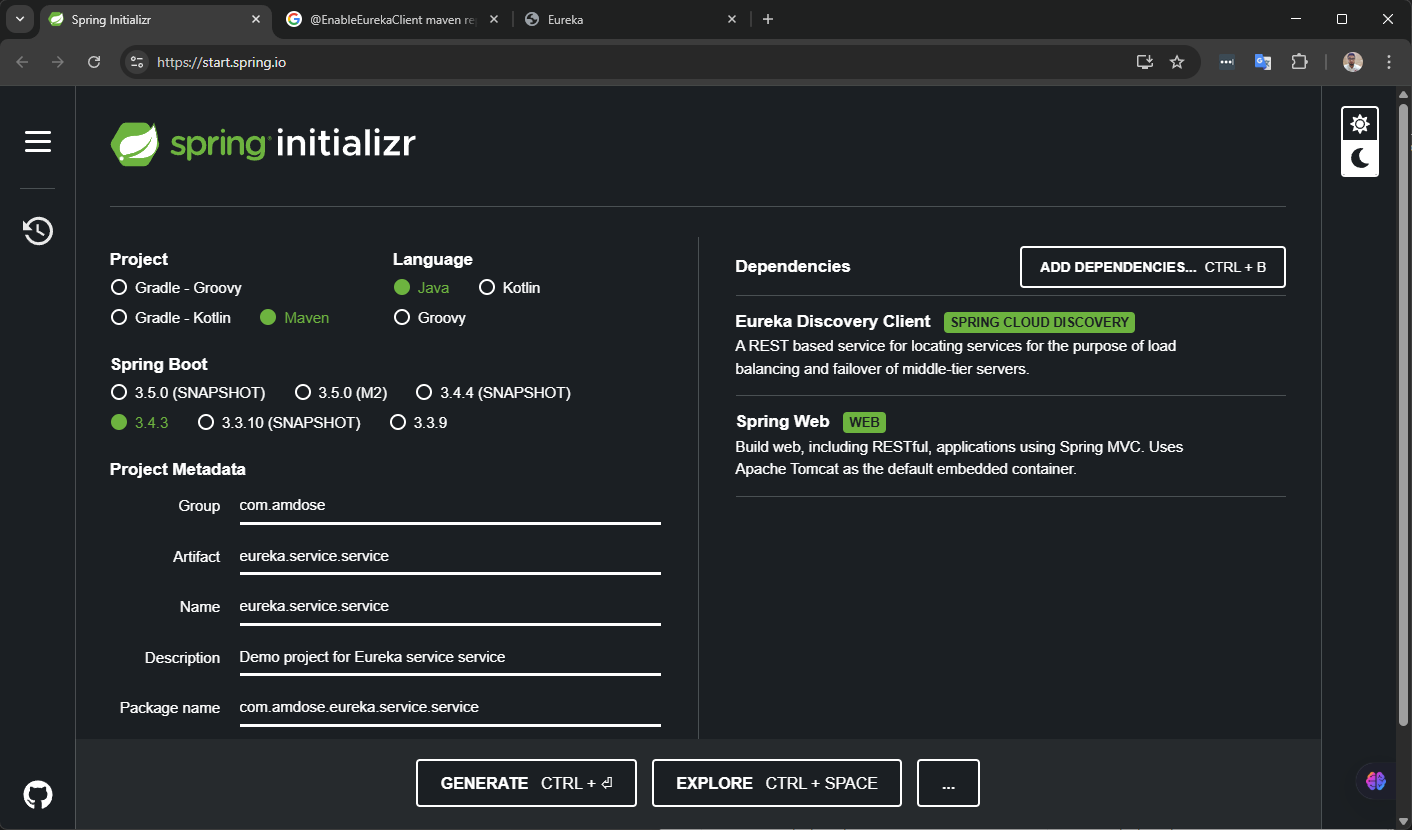
Step 1: Create a Spring Boot Project
Use Spring Initializr to create a new project with:
- Spring Web
- Spring Cloud Netflix Eureka Client
Step 2: Configure the Client
Configure the client in the application.properties file:
spring.application.name=sample-service
server.port=8080

eureka.client.service-url.defaultZone=http://localhost:8761/eureka/
eureka.instance.prefer-ip-address=true
This configuration:
- Names the service as "sample-service" (important for service discovery)
- Sets the port to 8080
- Specifies the Eureka Server URL
- Configures the instance to use IP address instead of hostname
Step 3: Create a REST API Endpoint
Let's create a simple REST endpoint that will be discovered and called by other services:
import org.springframework.web.bind.annotation.GetMapping;
import org.springframework.web.bind.annotation.RestController;

@RestController
public class HelloController {

    @GetMapping("/api/hello")
    public String hello() {
        return "Hello from sample-service!";
    }
}
This creates a simple endpoint at /api/hello that returns a greeting message.
Creating a Service Consumer
Let's create another service that will discover and communicate with our sample service.
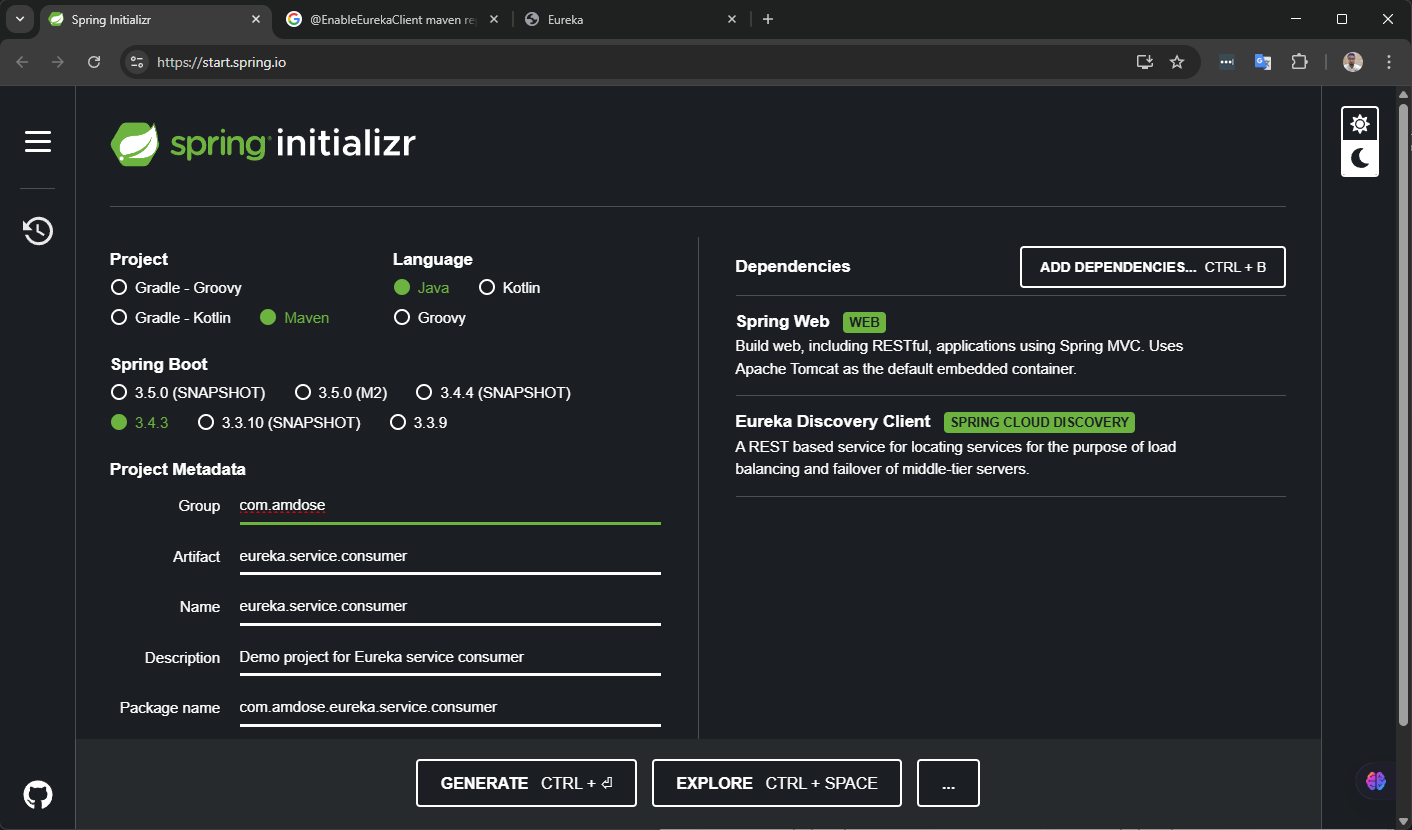
Step 1: Create a Spring Boot Project
Use Spring Initializr to create another project with:
- Spring Boot
- Spring Web
- Spring Cloud Netflix Eureka Client
Step 2: Configure the Consumer
Configure the consumer similarly to the sample service:
spring.application.name=consumer-service
server.port=8081

eureka.client.service-url.defaultZone=http://localhost:8761/eureka/
eureka.instance.prefer-ip-address=true
Step 3: Configure RestTemplate with Load Balancing
RestTemplate is Spring's standard way to make HTTP requests. Let's configure it to work with Eureka:
import org.springframework.cloud.client.loadbalancer.LoadBalanced;
import org.springframework.context.annotation.Bean;
import org.springframework.context.annotation.Configuration;
import org.springframework.web.client.RestTemplate;

@Configuration
public class RestTemplateConfig {

    @Bean
    @LoadBalanced
    public RestTemplate restTemplate() {
        return new RestTemplate();
    }
}
The @LoadBalanced annotation is crucial here - it enables the RestTemplate to use Netflix Ribbon for client-side load balancing with Eureka.
Client-Side Load Balancing:
- Consumer applications periodically fetch and cache the service registry from Eureka, typically refreshing every 30 seconds
- When using RestTemplate with
@LoadBalancedannotation (as shown above), the client uses Netflix Ribbon behind the scenes - Ribbon maintains the local cache of service instances from Eureka
- When you make a request like
restTemplate.getForObject("http://paapi/helloyment-service/api/payments"), Ribbon intercepts this - Ribbon picks an available instance from its local cache and routes the request directly
Step 4: Create a Controller to Use RestTemplate
import org.springframework.beans.factory.annotation.Autowired;
import org.springframework.web.bind.annotation.GetMapping;
import org.springframework.web.bind.annotation.RequestMapping;
import org.springframework.web.bind.annotation.RestController;
import org.springframework.web.client.RestTemplate;

@RestController
@RequestMapping("/api/consumer")
public class ConsumerController {

    @Autowired
    private RestTemplate restTemplate;

    @GetMapping("/forward")
    public String forwardToSampleService() {
        // Note the use of the service name 'sample-service' instead of a hardcoded URL
        String response = restTemplate.getForObject("http://sample-service/api/hello", String.class);
        return "Consumer received: " + response;
    }
}
The service name sample-service is resolved through the Eureka registry, not through DNS or your hosts file. This entire process happens automatically and transparently.
Testing Your Eureka Setup
After setting up your Eureka Server and client applications, here's how to verify everything is working correctly:
Step 1: Start the Eureka Server
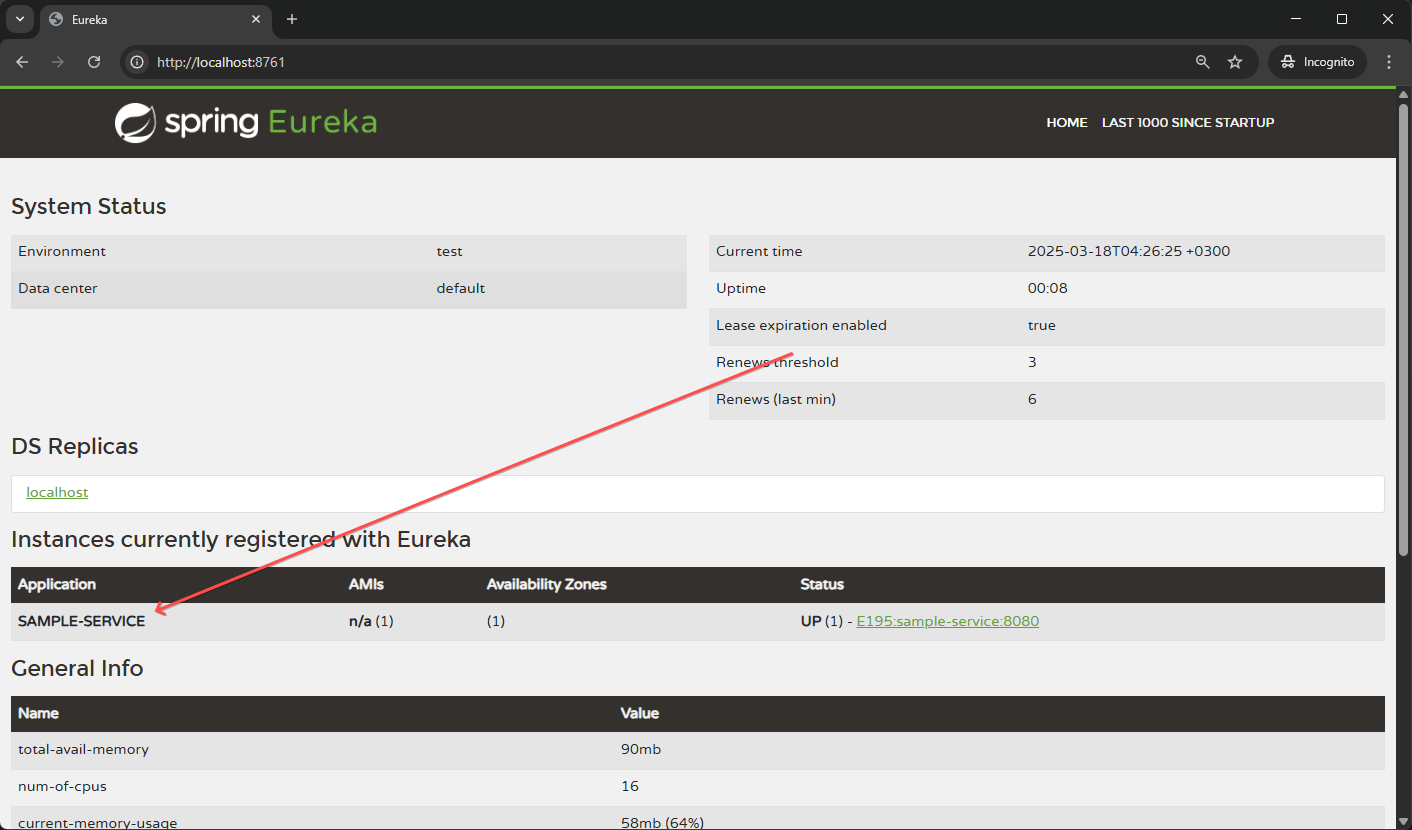
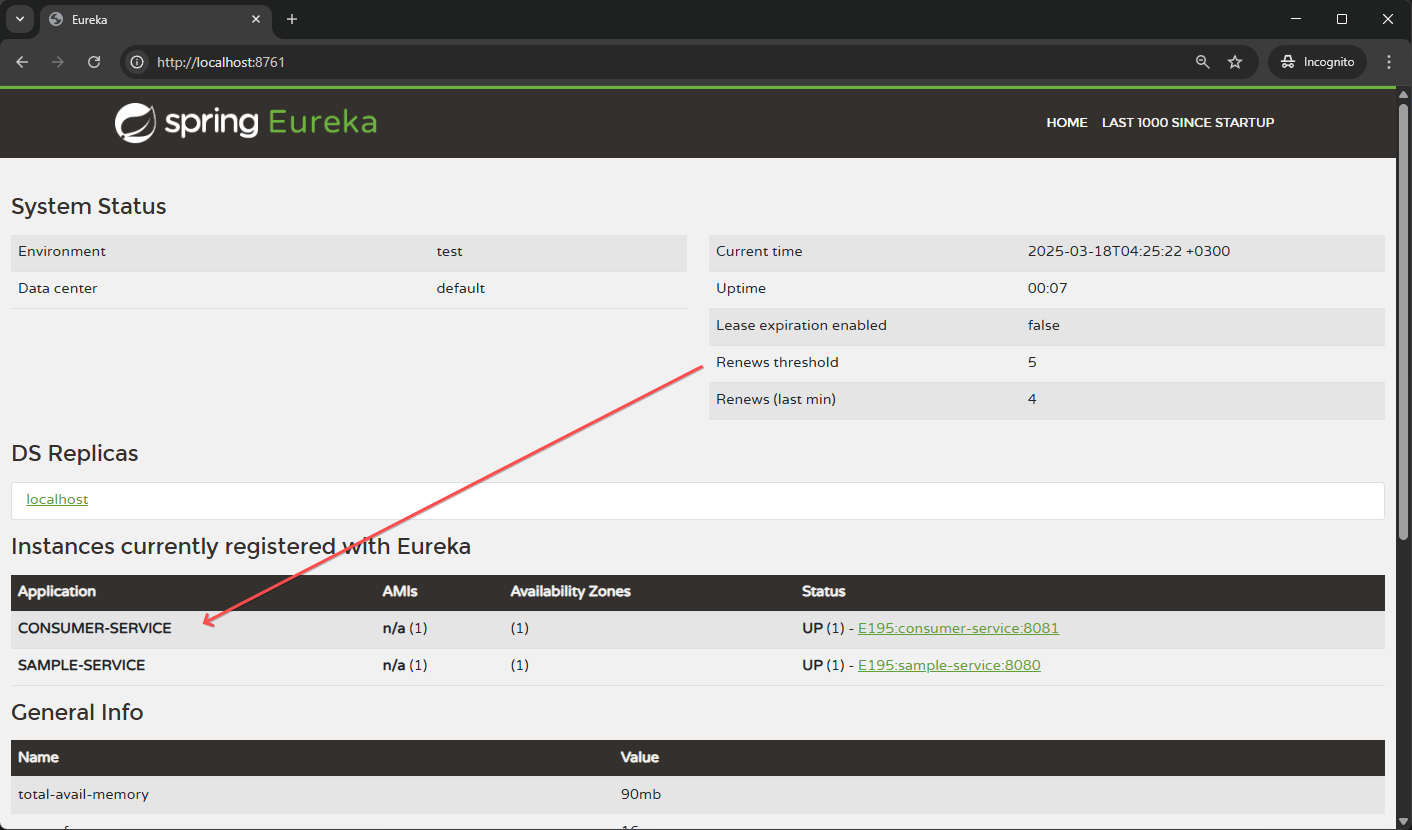
Run your Eureka Server application and navigate to http://localhost:8761 in your browser. You should see the Eureka dashboard with no instances registered yet.

Step 2: Start the Sample Service
Run your sample service application. After a few moments, refresh the Eureka dashboard. You should see the SAMPLE-SERVICE registered under "Instances currently registered with Eureka".
Step 3: Start the Consumer Service
Run your consumer service application. Again, refresh the Eureka dashboard to verify that CONSUMER-SERVICE is also registered.
Step 4: Test Service Discovery and Communication
To test that service discovery is working properly:
- Open a browser or use a tool like Postman to make a GET request to:Copy
http://localhost:8081/api/consumer/forward - You should see a response like:Copy
Consumer received: Hello from sample-service!
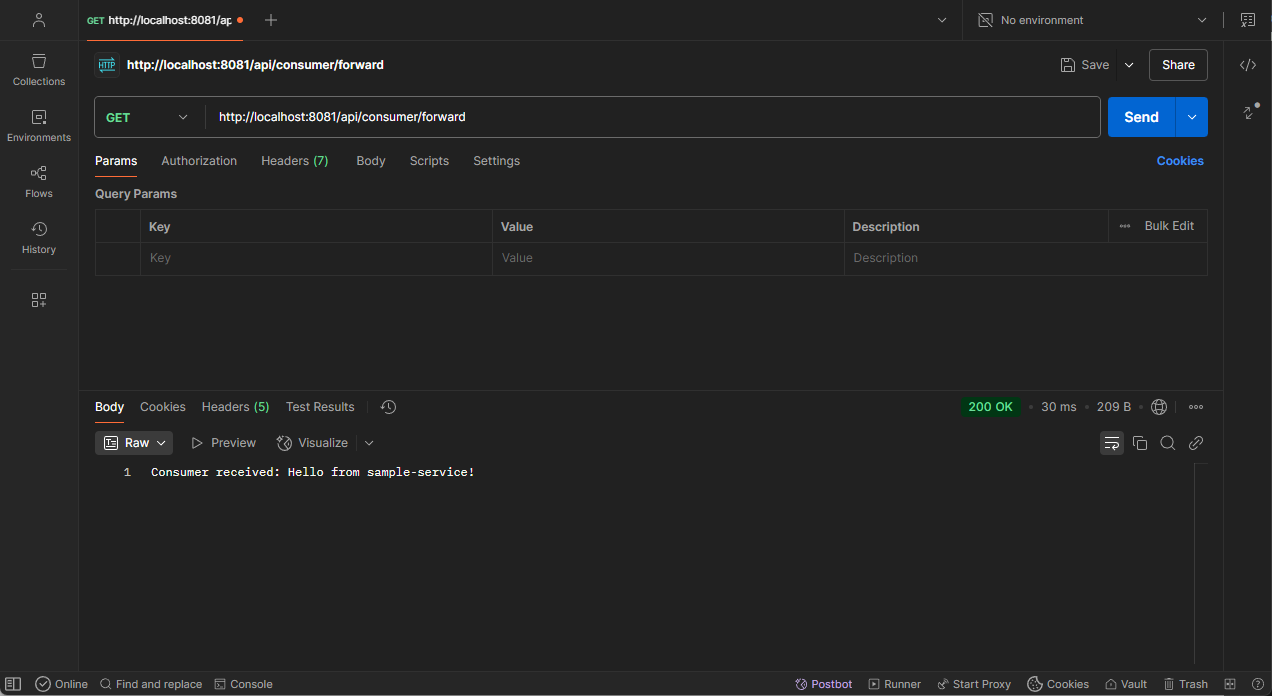
This confirms that:
- The consumer service discovered the sample service through Eureka
- The
RestTemplatewith@LoadBalancedannotation correctly resolved the service namesample-servicethrough the Eureka registry - The communication between services worked successfully
Advanced Eureka Configuration
For a production environment, you'll want to consider additional configurations:
High Availability
For high availability, you'll need to run multiple Eureka servers that register with each other. This requires running the same Eureka server application on different ports.
For better fault tolerance and to avoid single point of failure, it's a best practice to configure clients with the URLs of all Eureka servers in the cluster, so they can fall back to another server if one becomes unavailable:
eureka:
  client:
    service-url:
      defaultZone: http://localhost:8761/eureka/,http://localhost:8762/eureka/
This approach is preferable over putting a load balancer in front of your Eureka servers because it avoids creating a single point of failure. If you only configure clients with a single load balancer URL, that load balancer itself becomes a single point of failure. If it goes down, clients can't reach any Eureka servers, even if the Eureka servers themselves are healthy.
Having multiple direct Eureka server URLs in the client configuration ensures the resilience logic is built into the client itself, which aligns with Eureka's design philosophy of favoring availability and partition tolerance.
This configuration is not mandatory but highly recommended for production environments.
Security
Secure your Eureka Server and client communication:
Add Spring Security to your project dependencies with the following properties:
spring.security.user.name=eureka
spring.security.user.password=password

eureka.client.service-url.defaultZone=http://eureka:password@localhost:8761/eureka/
The configuration above implements basic authentication that protects the Eureka REST API, dashboard, and server-to-server communication from unauthorized access. While Eureka servers often run in private networks with strong network-level security controls, authentication is particularly important in two scenarios:
- Multi-tenant environments: When multiple teams or applications share the same Eureka cluster, authentication helps prevent accidental or unauthorized cross-team service registration and discovery.
- Compliance requirements: Some organizations must implement authentication for all services regardless of network placement to meet security policies, regulatory requirements, or audit standards.
Health Checks
Customize health checks in every registered service for better monitoring:

The below configurations change how your client services report their health status to the Eureka Server.
eureka.instance.health-check-url-path=/actuator/health
eureka.instance.status-page-url-path=/actuator/info
By default, Eureka uses a simple heartbeat mechanism, but by configuring these paths to point to Spring Boot Actuator endpoints, you get more comprehensive health information
Conclusion
Netflix Eureka with Spring Boot provides a robust solution for service discovery in microservices architectures. By following this guide, you can set up an effective service registry system that allows your services to discover and communicate with each other dynamically.
Remember that service discovery is just one part of a microservices ecosystem. It works best when combined with other patterns like API Gateway, Circuit Breaker, and Distributed Configuration for a complete microservices solution.
Want to learn more?
👉 Read Next: What Is Persistence Contexts In JPA?
👉 Read Next: What are Beans in Spring?
👉 Read Next: What Is Bean Lifecycle In Spring